Monday, July 23, 2012

Tape Mani & Nail Stamping

After seeing a few gorgeous tape manicures online over the past few weeks I thought I would give it a go.  My nails were already painted Julep Robin from the previous day so completely dry. I got out my a few of my newest Julep shades, some electrical tape, small scissors, and got to work.

The Supplies: (Right to Left) Seche Vite Fast Drying Top Coat, Julep Nail Therapy Basecoat, Julep Kate, Robin, Parker, Natalie, Courteney, Renee, Electrical Tape and Scissors

First, I cut out random strips of the tape and stuck them down paying close attention to securing them at the edges of my nails.
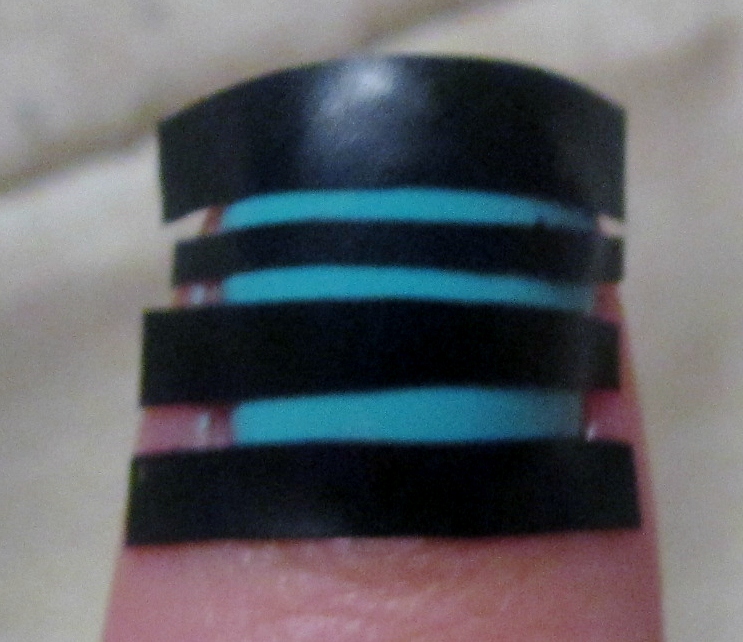
I kept going and used the different colors of polish at random, as well as the sizes of tape.
Since this was my first time trying this type of manicure I just learned from my mistakes as I went. The first thing I found out the hard way is that I am too impatient. Haha, I already knew this, but thought I was being good waiting for the polish to dry...no such luck. Some of my stripes got jagged and uneven due to me pulling up the tape too soon. The nails I let dry for quite a while before peeling up the tape turned out much better. 

I also learned to make sure I was painting all the way to the edge of my nails- this was tricky on the narrow stripes. Third, I realized not to layer on the polish too thick or it might get pulled up with the tape some as well. The electrical tape was great and didn't stick to the polish like scotch tape seems to do.


The painting and tape peeling process

I just used q-tips and nail polish remover to attempt to clean up the messy edges. If I were to do this manicure again I would also be careful to use thinner layers of polish to avoid such a mess haha. I also would paint each nail a different color to begin with.
Even though it is still a bit messy I am pleased with my first attempt. I love the colorful Julep polishes all together and the variety of stripes. Julep still has their penny box promo going on if you want to try them- just click the Julep icon to the right of my post if you're interested!

 I can see myself doing this again in the future, and hopefully getting better!! It is a pretty simple process so I would suggest anyone to try it! Being so new to nail art if I can do it anyone can haha. I am sure patient people would love their results ;)


I know it is a little sloppy, but as I mentioned before I am new at this! I hope you like this diy manicure :) Please leave me some feedback below. I would love to hear your thoughts and am for sure open to any pointers!! :)

A few weeks ago I also wrote that I bought my first nail stamps. Going back to my newbie nail enthusiatist status, I decided just to try out some cheap ones I found at Target for $9.99- Sally Hansen Nail Art Kit so sorry for the mistake, it is actually called Salon Express Nail Stamping Kit (as seen on tv by maybe some of you but sadly not me lol- I am a sucker for infomericals). Last night I painted my toes in my new Julep Daisy shade, and used the star nail plate with Julep Robin. With each nail I got a little better at the placement of the stamp. I was so happy that this kit actually worked!! I will post more nail stamp art in the future.
Here is what my kit looks like- it include the double ended stamper, scraper, and six nail plates


Close up with flash so you can hopefully see the little stars :)

No Flash

Once again please let me know what you think! Thanks for reading :)

Tuesday, July 17, 2012

Glamour Birchbox July 2012

Many of you have already received your July Glamour Birchboxes, so I will just do a quick little review of mine. After seeing the preview video I was really excited for the potential products I could be receiving this month. Though I really wanted the liquid eyeliner, and did not get it, I ended up really liking my box :)

 
My July Birchbox


The packaging this month was teal blue, and lime green which are two of my best favorite colors. The variety of the products included made me very happy as well. Here's what I got:


  Color Club Professional Nail Lacquer in Blue-Ming:
I had to start with this little blue beauty! I love me some nail polish so was thrilled to see this light mint blue bottle in my Birchbox!! Blue is my favorite color by far, and I do not have a light blue like this. I currently have Julep all over my nails and toenails, but really look forward to trying this polish out :)

Manna Kadar sheer glo shimmer lotion:
This small bottle of lotion is supposed to add a "supermodel-like sheen to skin". It can be mixed with foundation or used as a highlighter. The bottle is so full it was spilling out a bit when I tried to open the strange upside-down cap. The liquid is veryyy shimmery so it should last a long time which is nice. I only had to put a tiny bit on to see the color. I will keep you posted (no pun intended) on how I like this over the course of the week.
Uber Larabar in Roaster Nut Roll flavor: YUM!! I really liked this lifestyle extra even though a lot of people don't like getting food in their box. I am a fan of food for sure though so do not mind samples like this as long as there are other beauty samples in the box as well. I was expecting a mediocre tasting health bar since the nutritious values are stressed with this snack, but it actually tasted really good. I would buy these again if they were cheaper haha.

Suki Balancing Kit: 
Although these are small foil packets, I was happy to get this sample. I have been looking for something to clear up my disgusting blackheads, and Suki Exfoliate Foaming Cleanser has rave reviews all over the internet. I have been saving up my Birchbox points for the full size product which costs $32 I believe. With these samples I will be able to see if I really want to purchase the full size plus try out the Concentrated Balancing Toner, Balancing Day Lotion, Pure Facial Moisturizer, and the Transforming Cleansing Clay as well :) ::fingers crossed:: for good results.


Birchbox Exclusive Earbuds: I loved the blue color of these earbuds, and the fact that they do not hurt my ears like all my other headphones do.
 Gloss Moderne High Gloss Masque: This product is to be used on hair after showering. You leave it in your hair for a few minutes and then rinse it out to "restore bounce and shine to hair". It smells delicious and is a nice sized full tub- I was trying to figure out what the scent is, but my sister said coconuts. I will have to try this out tomorrow :)

Harvey Prince Eau Flirt: This little bottle almost spilled all over since it's not a spray cap, but smells decent. I did not know what to expect as it's described as a "fanciful scent of layers of fresh citrus, and jasmine notes over a base of lavendar and pumpkin". I love pumpkin, but as a perfume...yeah, I just didn't know what to think about that. It seems to smell more flowery though, so I will see what my boyfriend thinks of it before full blown wearing it.

I have to say I like July's box even more than June's. I hope this is the case every month ;) If you are interested in joining Birchbox you can sign up here https://www.birchbox.com?raf=2zl7x
Hope you enjoyed this little post, and your birchboxes if you're a member!! 
Color Club Blue-Ming on nails- It is a little darker in real life. A very light teal/ mint blueish green. I LOVE this color!!


Julep Parker, Robin, Courteney & Daisy!

My Julep Maven July monthly box came a few weeks ago, and inside was an exciting little coupon good for a FREE polish :) I immediately had to go into the Maven boutique and order Parker which is described as a golden tangerine creme.
Parker- golden tangerine creme
 I have had my eye on Parker since I joined Julep. Parker happens to be my incredible boyfriend's last name, which first attracted me to the polish itself. Now, I know that a lot of girls claim to have the best boyfriend ever, but sorry to break it to you ladies, I have been blessed with the greatest guy out there. He is selfless, and even puts up with my new found nail polish addiction. He keeps telling me I will need a walk-in nail polish closet one day...haha, now that is a tad bit extreme, but the truth is I know if I did need one (and they existed) he would make sure we had one lol. The color of Parker also reminds me of one of my alma maters color's. This makes me even happier since I was lucky enough to meet my boyfriend while we were in college.  I could seriously rant about the love of my life for years, but I guess I will show you how the polish looks on my nails now...

Top two pictures with flash, bottom without flash
 My boyfriend's idea :) Tips done with Julep Kate (Parker is darker in real life like in previous pictures)
 I was so happy when Parker came in the mail :) When applying it I found that it does take quite a few coats to make it opaque. I used three heavy coats on my nails to build it up to this bright orange color. With one coat the color was extremely pale and I could see my nails right through it. I am very happy with the color once layered, however, I wish the polish were thicker so I did not have to use so much of it for one application.

I have also purchased/ received a few other Julep products recently. Here they are:

Robin on nails- a little darker in real life (this is with no flash). A true Robin's egg blue that only took one coat :)
Other than using my voucher to receive Parker for free, I also bought Courteney, Daisy and the Best Pedi Creme Ever for $14.99 in a "Beat the Heat flash sale" Julep had a week ago. Julep sent me a complementary bottle of Robin when I e-mailed them about Daphne (which I received in my July box) being much darker than I expected- talk about amazing customer service!!! I am so excited to now have these "summer bright" colors which I missed out on in June having not joined until the end of the month. It was also a nice surprise to find small samples of Julep Glycolic Hand Scrub with my Robin box, and Courteney/ Daisy box. I do not have this product in the full size, but have heard great things about how smooth it makes your hands, so I will let you know how I like it soon!

From right to left: 


Parker- golden tangerine creme


Robin- robin's egg blue creme

Courteney- key-lime green creme

 Daisy- bright lemon yellow creme


As you can see I have only used Parker so far out of these four, but I thin the colors are all very pretty, and I will be sure to post once I do try them on :)


The Best Pedi Creme Ever! 


I had a bottle of this that was running out from my intro box. I get really g-ross cracked heels in the winter, and have used a ton of different foot creams to try and fix them. The lotions I have used always feel good initially and make them a bit softer, but do not get rid of all of that nasty dried skin. I have not used other products labeled as pedi creams before, so cannot vogue for this being the best pedi creme ever, haha, but it really has helped get that unwanted skin/ roughness off of my feet. The bottle is quite small, so I was excited to get another one in the Beat the Heat sale, and that Julep included a small packet of it with my Parker nail polish. I would recommend this product to anyone who wants softer feet.


If you are interested in trying Julep you can get an intro box for a penny right now :) Just use the link  http://julep.com/?r=21739311 and enter the promo code COLOR2012. Julep will have you take a little quiz to see what your style is (which intro box you get). It takes about two minutes. Don't like the style they chose for you? Just retake the quiz, or pick a different style after you view the amazing color choices. If you have any questions about Julep feel free to comment below or check out my previous Julep posts! My Intro Box I purchased for a penny is shown in the link here :)


Wednesday, July 11, 2012

Having A Sweet Time"line"


I have been blessed with the opportunity to have a career in teaching :) Currently I teach third grade, and I also did my student teaching in a third grade classroom. Next year will be my second year of teaching which seems insane! It really does not seem like I could have survived ;) my first year yet haha. Teaching is the most difficult, hectic, challenging, wonderful, fulfilling, rewarding thing in the world.

With that I would like to present to you my first teaching post :) When trying to decide where to even start I decided why not at the beginning...kinda. I have had so many opportunities to be in various classrooms, but student teaching as many of you know, is the first chance to feel like you have you are a real educator. So, student teaching it is. For third grade, at least in the state I live, one of the social studies standards is all about learning how to interpret, and create timelines. When student teaching I thought ahhhh! How am I going to make timelines exciting?? Luckily, I had the most incredible mentor teacher there is, and she helped me come up with some sweet ideas!!( Literally, I cannot sing her praises enough, and am so thankful for the amazing staff who accepted me so graciously and helped me through every aspect of student teaching, and still support me- I miss you all so much!!!) Wanting to make the learning relate to the student's interest we thought well, what do kids like...candy! I also did a toy timeline activity I will have to find and post at a later date.

For my Having A Sweet Time"line" lesson the students were presented with a list of popular candies, and the dates they were created with facts about each product in a random date order. The students task was to assemble a timeline in chronological order using these dates. This project was at the beginning of our timeline unit so served as quite the informal assessment of whether the students knew basic chronological order/ had been comprehending the basic intro to timeline lessons we did a few days ago.

Here are the finished products :)


 If I were to do this project again I would think of a better way to display it lol. It ended up looking kinda wonky in the hallway because they were so long they could not all fit on our one bulletin board and the bricks did not want to let any type of adhesive stick to them. I would also have the students assemble the strips of cardboard (I did it all by myself and it took a longgg time).

 As more of an extension activity I would love for students to cut out colored pictures of candies and then look up the dates they were created and use   them as more personalized timelines.

Overall the kids enjoyed making their timelines, and the objectives were met. The students even surprised me quizzing their friends by asking them questions such as how many years after Reese cups were invented did someone invent m&ms? It was great to see them pose questions similar to the ones I had been asking them in class! I hope you enjoy this sweet little project :)

Sunday, July 8, 2012

Julep July American Beauty


Those of you who are familiar with the Julep Maven program know that each month you get one box of nail products in the mail. You have from the 20th-24th to decide if you want to keep the style of box you get as result of the quiz when you signed up for the program, switch to a different style or skip the month. Even though I decided to switch from my original American Beauty style for my July Julep box to It Girl this month, once I saw other bloggers swatches and reviews I just had to order this box as well! I was excited that in the Maven Boutique I could choose a box with Oh Canada in it (being from the USA I received the sparkling America in my It Girl Box). I also really wanted to try out the new lip gloss which retails for $18. Since my entire box only cost me $19.99 getting such a pricey item inside seemed to justify the purchase ;).

If you would like to try out Julep simply click here:http://julep.com/?r=21739311, take a short quiz, enter the promo code COLOR2012 at checkout, and you can get an intro box for a penny!! Yupp, only a penny! If you are interested in more details about Julep feel free to comment below, or refer to my Julep Intro Box post :)

My American Beauty box included:
Yikes, sorry for the glare off the caps!!

Up top: Peony lip vernis Left to right: Oh Canada, Yumi, Lynn
 
Peony- a light pink/nude lip gloss
Oh Canada- a red and translucent glitter polish
 Lynn- a pink shimmery nude polish
Yumi- a pink and silver glitter polish

I decided to take off the America polish today, and try out Lynn and Yumi with the french tip manicure Julep suggested on the card included in the box.  I would like to show you what I think look like princess nails!!! :)


 Lynn went on very light in color, and I used two generous coats to get this deeper pale pink color.  I did my best with the tips...I am still a newbie so bare with me please :) Yumi applied nicely and is so gorgeous. I love the way these two colors go together. I really feel like a pretty, pretty princess!

I am yet to try out Oh Canada, but so excited to have the chance to own it. As I mentioned in my last post I have a strong love for Canada. 

As for my Peony lip gloss...I sadly cannot say that I love it. The tube is nice, and lightweight making it easy to throw into your purse.  That is the plus side. The tube makes quite the loud suction sound when you pull the wand out to apply the gloss.  It is a milky extremely light pink color that, despite other reviews I have seen, I find to be sticky. It is a pretty shade and smells like delicious cupcakes, but is not quite what I was expecting for an $18 product from my beloved Julep. I still am happy I got to try out the lip gloss for a much cheaper price than if I got curious about it and bought it from the site on my own.

Overall, I am happy I ordered the American Beauty box. The colors are just so pretty, and nice additions to my little collection.

Now for some randomness:
The other day my sister was nice enough to let me give her a manicure with my add-on colors for the month Frieda and Chelsea as the accent nail!!
She even modeled it for me :)
We were pleased with how it turned out, and decided these mani reminded us of Barbie, in the best way possible :) The polish is still holding up nicely with no chips and it is three days later- gotta love that!

I also purchased a Salon Express nail stamp/ plates kit today. I have been wanting to try out nail stamping so badly, and though this kit is small I am excited to try out all the designs. Here is my first attempt on my toe (sorry my nails were already occupied). I love the way it turned out, how easy it was to use and will be posting more about the soon, so keep a look out!!
Zebra stamp done with Julep Natalie. On my other toe I have Julep Mila. The yellow is Sally Hansen Hard as Nails Mellow Yellow.

I also tried out the glitter ombre effect using two coats of Julep Kate as my basecoat (over top of Julep Nail Therapy), then layering Julep's Mila, Chelsea, and Yumi and Seche Vite Fast Drying topcoat which I just purchased and loveeee :) The first picture is taken with no flash, and the second with a flash.


Soooo sparkly and pretty :) They catch the light from every direction. It should be interesting trying to remove this pedicure however...I will let you know how that goes haha.

Saturday, July 7, 2012

Sally Hansen Salon Effects Nail Polish Strips

Curious about these? Read on!
Photo credit:missmoonsmusings.blogspot.com


A few months ago I discovered beautiful patterned sticker looking things from Sally Hansen. After searching the internet I found out that they were not stickers at all, but something much more glorious- actual nail polish in a strip form you put on your nail like a sticker!! Obviously I was instantly intrigued, and decided to buy these little guys in mass quantities! Even though they were pricey (the cheapest I found was about 8.50 on sale) I wanted every pattern. For someone as indecisive as me picking a pattern is rough!! 

Here are some, sadly not all, of my pattern choices within a few months:
Sally Hansen Salon Effects in the pattern Are You Single? from the Valentine's Day Collection
Sally Hansen Salon Effects in the pattern I Love Lacey
Sally Hansen Salon Effects in the pattern Mad for Plaid from the Easter collection

Overall, my opinion is these strips are way more fun than they are practical for the cost.  They take a while to apply and sometimes get torn on application/ are too big for your nail bed and rip when you try to take off the excess around nail or at end of the nail. Once I got the hang of putting them on I could get two nails out of one strip which made me feel a bit better about the price. When I used a top coat they stayed on for around a week without a ton of damage for me. However, my entire strip tended to fall all the way off rather than just "chipping" as normal nail polish does, so that presents it's own issue depending on if you have extras handy when it happens.

I also found that if you put them on your toes (yes, I have seen the new ones that are specifically for your toes, but the finger ones work just as well) they stay on much better/ longer! I also discovered that at Rue 21 you can get the same product for around $3 (my zebra pack even had 21 strips as opposed to Sally's 16). The Rue 21 ones do not seem to be of the same quality however, and did not stay on my fingers well at all.They did last well on my toeies however. Yes, I said toeies ;). Now, pardon the picture of my foot (I highly dislike feet myself), but I LOVE zebra print!

Rue 21 Zebra Print Nail Polish Strips

 These little creations are fun, I will not lie, and there are sooo many fun patterns to chose from. All in all, if you are willing to spend around $10 I would give the Sally Hansen ones a try, or $3 for the Rue 21 strips if you want to give yourself a fun pedicure. It can be quite costly if you get hooked like I did for a while, sigh haha. However, if you find a good sale (Let me know! I mean...), or just want to try something new these are for sure fun for a short lived pattern on nails :)

Friday, July 6, 2012

Julep July It Girl/ Add Ons

Julep Maven July Box & Add-Ons :) 

My July Julep box finally got here, and I am thrilled!! Shipping took forever, and I actually got my "add-ons" today at the same time (not that I am complaining about that)! I am not sure why USPS decided to hold my package in Settle for fifty years, or send my add-ons to California, but I guess it is just one of the unsolved mysteries such as how many licks does it take to get to the center of a Tootsiepop- the world may never know. ;)

Anyways, I am just so glad it arrived!! Here are the goods: 

My July It Girl box (left) & my cute little add-on box (right)


Even though, according to the quiz I took, I am American Beauty, I decided to switch to the It Girl box this month because of the promised seafoam green shade of Daphne. My favorite color in the world in blue, and this bright teal shade was right up my alley!! I was also so excited to paint my nails with the freebie polish Julep gave all U.S. Mavens- America!

It's like Julep Christmas!! Left to right: America, Mila, Kate, Daphne, Frieda, Chelsea

My July It Girl box was filled with America in all it's red, white, blue & silver star glitter glory, Mila- a silver glitter with teal, orange, purple and green sparkles just to name a few, Kate- a pearly white, and Daphne- which is not seafoam green :( but instead a darker teal color. 

I have to say I love these polishes, but am let down by Daphne! It does not look anything like the swatches :( I emailed Julep today about it as they advised anyone not digging the darker color to do on their Facebook page so we will see what their wonderful, and I mean wonderful CS team says :) My box was also filled with red, white and blue little paper decorations, Fireball candies, and wrapped in star paper with a red ribbon- very festive! I even got a voucher for a free polish!!

My add-ons are Frieda- a shimmery fuschia which happens to share the name of one of my alma maters' mascots :) , and Chelsea a brilliant purple glitter with teal and silver sparkles

Left to Right: America, Mila, Kate, Daphne. Polishes in my It Girl July Box :)

Frieda and Chelsea- so sorry for the glare (this was even without a flash ). My add-ons I got for 4.99 each.
America
I know this is a weird picture, but I was hoping you could see the three stars on my thumb :)


Although I was sad not to get America in time for the 4th, I am excited to rock it while watching the Olympics! It is just beautiful on my nails and mine has so many stars! I saw some horror stories about it being impossible to apply, but luckily I guess I got a good one because it went on nicely.

I am so excited to try the rest of my polishes, and there will be more swatches to come once I decide to take America off. I also have an American Beauty box on it's way- I couldn't resist! It will be coming with Oh Canada, a lip gloss I am stoked to try as well as Lynn and Yumi. I took Canadian Studies in college and met my best friend there so have a strange love for the country hehe.

So, I might just be obsessed with Julep now, let's be honest :/ If you would like to try it out for a penny simply click here if you would be so kind: http://julep.com/?r=21739311 
take the little style quiz, and enter promo code COLOR2012. Even though I thought this had to be a scam it really is a penny. You can decide to keep the subscription, skip a month if you want to save some money but not cancel completely, or cancel whenever you little heart desires. Enjoy!!